
How To Transform Any Photo into a Professional Headshot
Transform any photo into a polished AI headshot in minutes—perfect for job seekers, professionals, and teams needing instant, credible profiles.

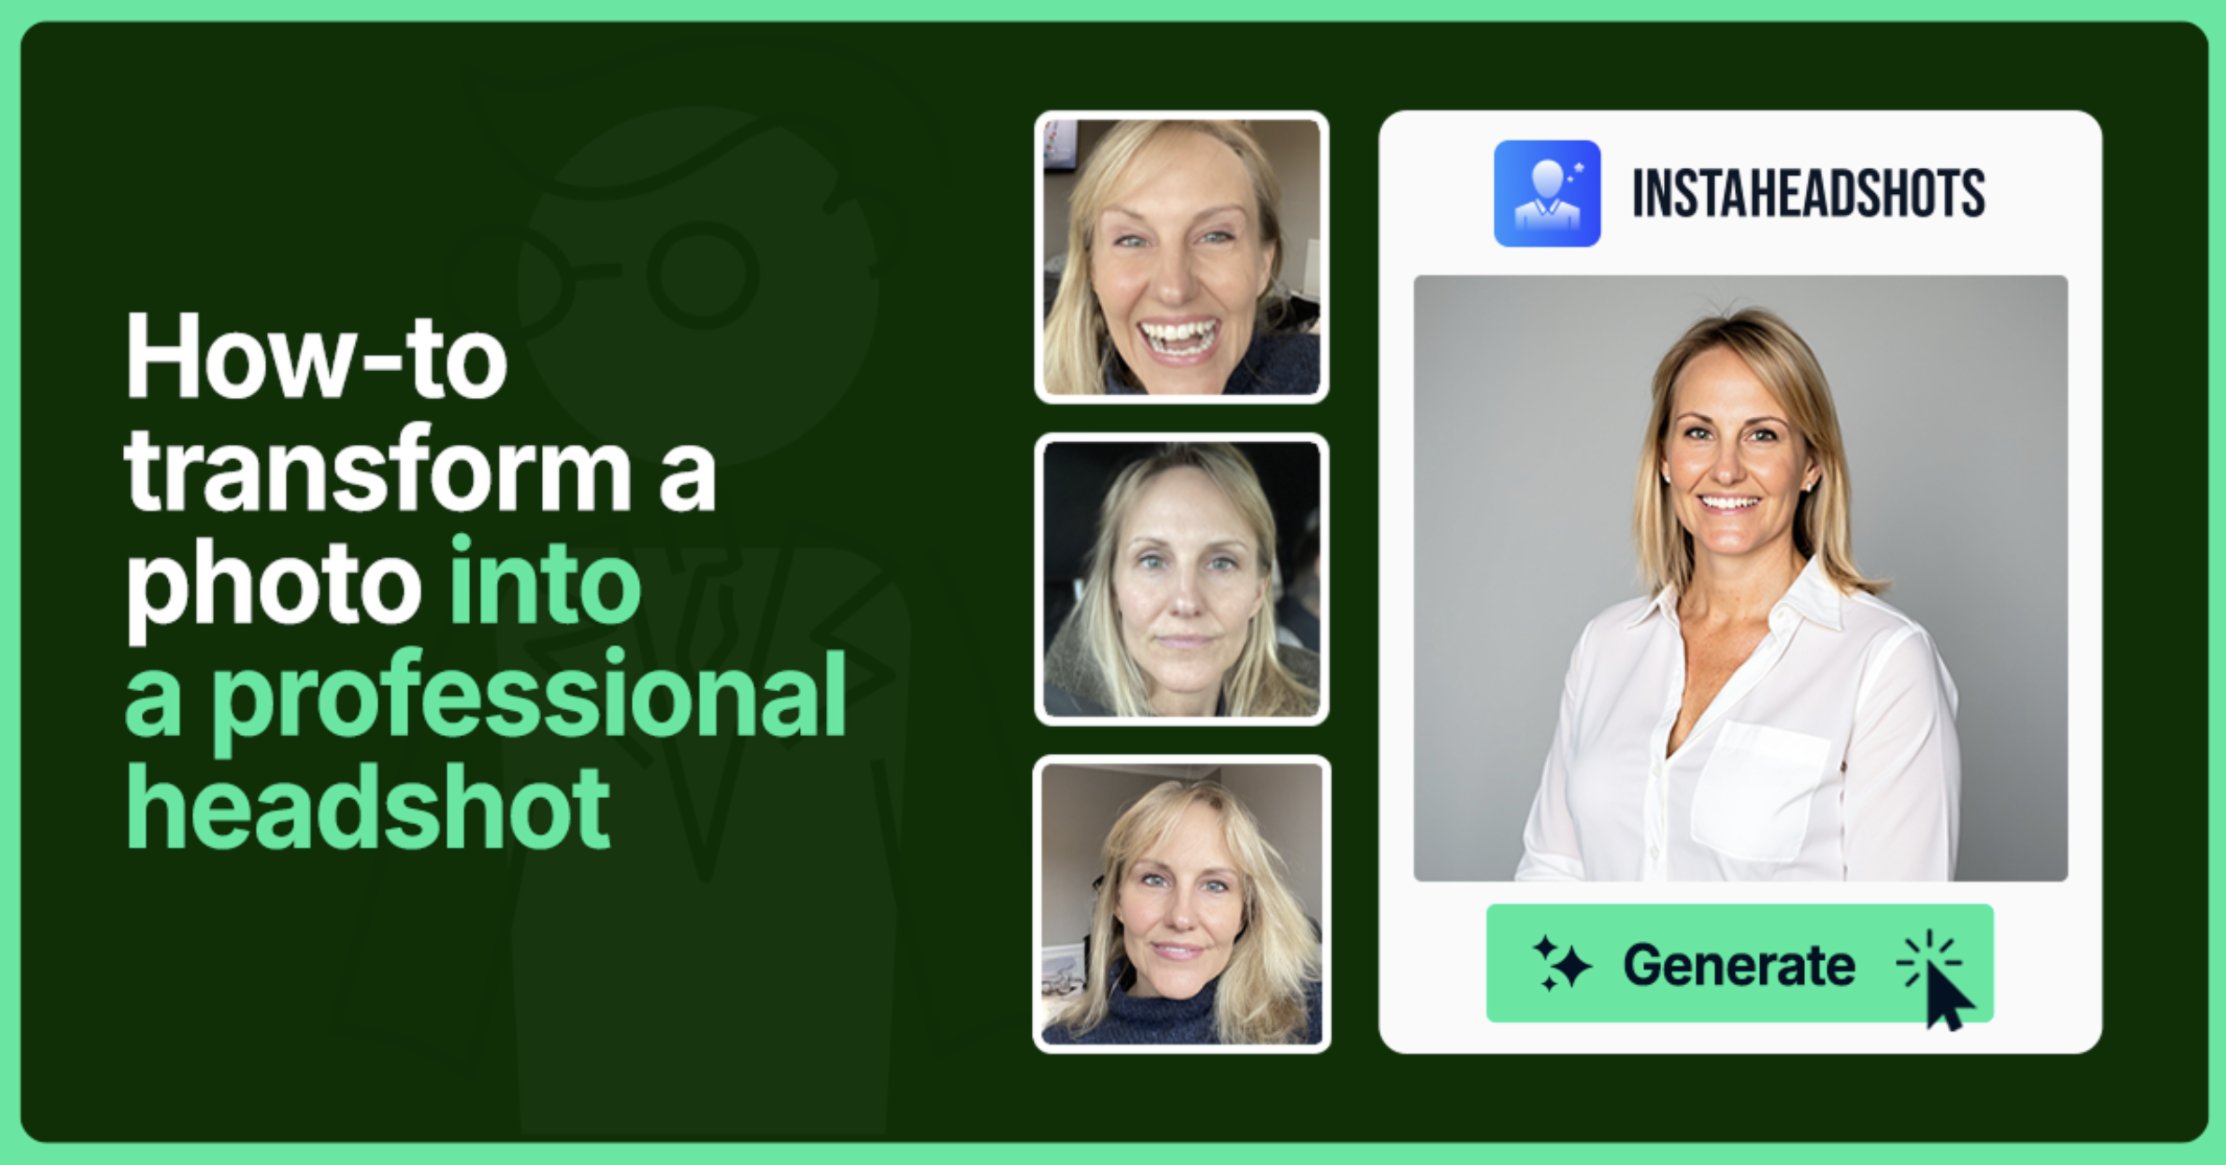
Turn your casual photos into refined headshots in minutes—no photographer needed.
Professional headshots are a must for LinkedIn, resumes, websites, and personal branding. They’re the first thing people notice—even before reading your bio, scanning your work experience, or deciding whether to respond to your message.
Yet many people still rely on outdated or makeshift images: a five-year-old studio portrait, a cropped vacation photo, or inconsistent team headshots. Each of these silently undercuts authority and approachability.
You don’t need to spend hundreds of dollars on a studio, coordinate outfits, or wait weeks for proofs. AI technology now makes it possible to transform any casual photo into a headshot that highlights your best features.
With AI headshot generators like InstaHeadshots, you get immediate access to studio-grade portraits created from photos you already have.
This isn’t about replacing photographers. It’s about giving busy professionals a way to take control of their image right now. This tutorial will show you how simple the process can be with InstaHeadshots.
TL;DR: Converting a casual selfie or photo into a headshot is fast and affordable with AI tools like InstaHeadshots. Upload 5–15 clear images, select headshot styles and backgrounds that match your brand, preview and refine your favorites, then download high-resolution files ready for LinkedIn, resumes, and company profiles—all without booking a studio session.
How to transform any photo into a headshot
With a smartphone and a handful of clear selfies, you can generate studio-quality portraits in minutes—no scheduling, travel, or expensive headshot sessions needed. Here’s how to use InstaHeadshots to turn everyday photos into headshots in just four simple steps.
1. Upload your photo
First, upload 5–15 clear pictures of yourself to give InstaHeadshots’ AI technology enough input to learn your features accurately. Selfies are fine (and you probably already have plenty on your phone), so no need for a fresh photo shoot.
For best results, choose pictures with:
- Bright, natural, even lighting
- A good look at your face from different angles (straight-on, slight turns left/right, looking slightly up/down)
- Neutral or slight expressions; avoid exaggerated smiles or frowns
- Sharp focus with minimal motion blur
Avoid these common pitfalls:
- Remove sunglasses, hats, or anything that obscures your face (except corrective lenses).
- Skip heavy beauty filters, color overlays, or dramatic effects.
- Include a mix of casual and professional looks if available.
Diverse, well-lit input photos give the AI the detail it needs to generate headshots that reflect your authentic features, natural expressions, and subtle traits like freckles or hair texture.
2. Pick styles or backgrounds
Backgrounds set the tone for your headshot, so choose carefully. (We’ll cover exactly how to choose a background that matches your brand later on in the article, so stick around!) When picking your headshot style, go for one that aligns with your role and industry:
- Business formal: Sharp suits, structured clothing, authoritative yet approachable
- Business casual: Relaxed but polished—ideal for modern office or client-facing roles
- Creative roles: Expressive, modern, or slightly playful while still maintaining credibility
Context matters, too. For LinkedIn, a neutral background or soft gradient creates a polished, approachable presence. Company websites and press bios often call for modern office or creative settings that align with your brand image. If your headshots will appear in pitch decks or presentations, a slightly bolder or more eye-catching option can help you stand out.
Unlike traditional studio shoots, where you’re limited to one backdrop, InstaHeadshots automatically generates dozens of variations. That means you don’t waste time manually tweaking or experimenting with less sophisticated photo editing tools.
3. Preview and refine the headshot photo
Once the AI generates your initial results, review how well it captured your features, expressions, and overall presence. From there, you have the option to refine your photos with options like:
- Lighting adjustments: Fine-tune brightness, contrast, and shadow balance for a natural, photorealistic look.
- Tweaking expressions: Make subtle shifts to smiles, eye openness, or posture to match your professional vibe.
- Selecting the best angles: Compare straight-on, slightly turned, or elevated views to highlight your strengths.
Top AI headshot generators like InstaHeadshots provide 100–200 variations, giving you plenty of options to land on the perfect headshot.
Tip: Choose images that feel like you on your best day—confident, approachable, and professional—so your headshot works well across any platform, whether it’s your social media, company website, conference speaker bio, or beyond.
4. Download your professional picture
Once you’re satisfied, download high-resolution files that are ready for immediate use—no extra editing or retouching required!
Standard delivery formats include:
- JPEG: Ideal for web profiles, social media, and presentations.
- PNG: Preserves quality for digital portfolios or documents with transparent backgrounds.
- TIFF: Best for print applications such as business cards, brochures, or marketing materials.
With your finalized AI photos, you can refresh every professional profile at once without waiting for a photographer, coordinating schedules, or paying studio fees.
Choosing the right source photos for realistic AI headshots
AI-generated headshots can be fantastic—when the input is good. Clear, well-composed images give the AI model what it needs to capture your facial features, natural expressions, and authentic skin texture. The better your input photos, the more realistic your headshots will be. Here’s how to set yourself up for success.
Find clear, well-lit shots
Lighting is critical for realistic headshots. Use natural daylight or evenly distributed light to avoid harsh shadows, blown-out highlights, or washed-out features.
Golden hour (shortly after sunrise or before sunset) adds flattering warmth that enhances skin tones. By contrast, overhead or harsh artificial light can create unflattering shadows that distort your features and affect AI accuracy.
Clarity matters just as much as lighting. Your photos should be sharp, free of motion blur, and captured at a resolution high enough for detail. (Most modern smartphones meet this standard.)
Examples:
- Good: A selfie taken near a north-facing window, face evenly lit with soft shadows and sharp focus
- Poor: A photo under harsh overhead office lights, which cast strong shadows, or a blurry image snapped mid-movement
Tips for the best results:
- Position yourself near a window or outdoor spot for soft, even light.
- Avoid direct sunlight or overhead fixtures that create strong shadows.
- Keep your camera steady to prevent blur.
- Choose a background with minimal distractions so the AI can focus on your face.
With clear, well-lit source photos, the AI has everything it needs to produce professional-looking headshots that appear natural and flattering.
Keep expressions natural
Authentic expressions help your headshot feel approachable and professional. Aim for a slight, relaxed smile or a neutral, confident look that reflects how you naturally present yourself.
Forced smiles, exaggerated expressions, or overly dramatic poses can make your AI-generated headshot look stiff or unnatural, hurting first impressions. Capturing a variety of natural expressions gives the AI flexibility to create headshots that look authentic and true to you.
- Practice in front of a mirror to find your most natural, approachable look.
- Take multiple photos with subtle variations: friendly, serious, and confident expressions.
- Relax your jaw and shoulders to avoid tension that shows on camera.
- Look slightly past the lens rather than directly at it for a more candid feel.
Avoid heavily filtered selfies
Filters may look fun on social media, but they confuse AI algorithms by distorting skin tone, facial structure, and natural skin and hair textures.
Beauty filters, color overlays, and dramatic effects make it harder for the system to generate realistic results. Basic color correction and neutral enhancements are fine, but your photos should highlight authentic skin texture, hair details, and natural lighting.
For best results:
- Turn off beauty modes at the source: Set skin-smoothing, “beauty,” and “retouch” sliders to 0 in your camera app. On iPhone, avoid Portrait Lighting effects; on Android (Samsung, etc.), disable Face/Beauty adjustments.
- Skip Portrait/Bokeh effects: Artificial background blur and edge cutouts can distort hairlines, ears, and glasses—details our model uses to lock onto your identity.
- Keep real skin texture: Don’t apply skin-smoothing, frequency separation, aggressive noise reduction, or “makeup” stickers. Pores, fine lines, freckles, and flyaways help the AI preserve your true look.
- Maintain true color: Avoid LUTs, heavy saturation, and color casts (orange/teal). Mild exposure or white-balance tweaks are OK; anything stylized is not.
- Preserve identity details: Keep glasses on if you wear them, don’t remove facial hair, and don’t over-groom eyebrows or stray hairs—these micro-features improve resemblance.
- Quick self-check before uploading: Zoom to 100%: if skin looks plastic, eyebrows/beard blur into the face, or background edges “halo,” it’s filtered. Re-shoot or use a clean original.
These guardrails help InstaHeadshots capture the fine detail (wrinkles, hair texture, glasses, facial hair) that other generators often smooth away—so your final headshots look photoreal, not airbrushed.
Use multiple angles
Include straight-on shots, slight turns to the left or right, and subtle upward or downward tilts. This variety gives the AI a full sense of your features, ensuring the final portrait looks natural and well-proportioned.
- Follow a simple shot plan (10–15 photos): 3 straight-on, 4 three-quarter (30–45°) split left/right, 2 soft profiles (~60°) split left/right, 2 with a slight chin tilt (5–10° up/down), and 2 repeats at your best angle.
- Keep the camera at eye level: Extreme high or low angles warp jawlines and noses—great for selfies, bad for headshots.
- Step back, then zoom: Avoid wide-angle distortion from closeups. Frame head + shoulders; don’t crop off the top of your head.
- Alternate sides on purpose: Capture both left and right turns; don’t rely on mirrored duplicates.
- Change one variable at a time: Angle first, then subtle expression (for example, going from a neutral face to a soft smile). Skip exaggerated expressions that stretch features.
- Cull near-duplicates: If two shots look the same at a glance, keep the sharper one and delete the twin. Variety beats volume.
Comparing AI solutions to traditional photo shoots
Traditional photo shoots have their place, especially for those who value in-person direction and physical studio setups. They can capture lighting nuances and artistic styles unique to the session. But for most busy professionals, the time, cost, and logistical hassle are significant.
AI headshot generators like InstaHeadshots deliver comparable or better results with far greater speed and flexibility. You get studio-quality portraits without coordinating schedules, traveling, or waiting weeks for your photos. Here’s how they compare:
For busy professionals seeking efficiency, quality, and versatility, corporate headshots from InstaHeadshots are the smarter choice.
Tips for ensuring your AI headshots look authentic
The fear of AI headshots looking “fake” is real. Nobody wants a photo that screams “AI avatar.”
Low-quality AI tools often produce waxy skin, vacant gazes, or exaggerated features. That might be acceptable for avatars, but it’s damaging to professional credibility. InstaHeadshots, trained on millions of human portraits, helps you avoid these pitfalls. Here’s how to make sure your AI headshots look like the real you, not a mannequin.
Maintain natural skin tones
Accurate skin tone is critical to preserving authenticity. Compare AI outputs with your real-life photos to confirm the colors match your natural complexion. Avoid over-smoothing, heavy retouching, or filters that erase freckles, fine lines, or natural texture.
High-quality AI headshot generators, like InstaHeadshots, preserve subtle features such as skin, hairstyle, and clothing textures, delivering photorealistic portraits that feel like you rather than an artificial version of yourself.
Choose a background that matches your brand
Your backdrop is just as much a part of your personal brand positioning as your likeness. Pick one that reinforces your industry, signals credibility, and aligns with the visuals people already associate with you (website palette, LinkedIn banner, company style guide).
- Neutral gray: Timeless, glare-free, and universally professional. Safest choice for cross-industry use and ATS/press needs.
- Modern office: Clean, airy workspace with light depth-of-field. Reads “tech-forward, approachable,” ideal for startups, SaaS, product, or creative roles.
- Traditional office: Subtle, classic environment (bookcase, conference glass, muted tones). Conveys stability and authority for finance, legal, or consulting.
- Soft gradient: Polished studio look that can match a brand color. Great for client-facing pros (advisors, real estate, coaching) and personal sites/portfolios.
Avoid over-retouching
Subtle enhancements, such as minor lighting adjustments or gentle color correction, can improve a photo, but heavy retouching creates a plastic look that undermines trust. Steer clear of AI features that over-smooth skin, alter facial features, or exaggerate expressions.
The best AI headshot generators focus on realism over fantasy. InstaHeadshots stands out for preserving authentic details while delivering studio-quality portraits that look natural and believable.
Elevate your professional presence with a faster, smarter approach
Getting a strong headshot no longer requires studio sessions, long waits, or steep prices. AI-powered tools make it possible to turn everyday photos into high-quality headshots in minutes, giving you the presence you need for LinkedIn, resumes, and company websites.
Professionals across industries, from finance and tech to consulting and real estate, are already using AI solutions for professional portraits. More than 150,000 people, including teams at Google, Microsoft, and Goldman Sachs, have used InstaHeadshots to create over 15 million images, proving that modern AI-powered tools can match, or even surpass, traditional photography.
Stop waiting for complicated photo sessions. Get your AI headshots today with InstaHeadshots.